|
Grades
8 to 12 |
|
Introduction:
(Initial
Observation)
|
Making an electric generator is a
good way of learning the principles of generators. It also is an
exciting science project.
As a display project, you just
need to make a generator and demonstrate it's structure. As an
experimental project, you need to come up with questions about the
factors that may affect the rate of production of electricity.
|
 |
| Dear
* This project guide is a
modified version of the Wooden Generator project by
MiniScience.com. With this modification you have choice to purchase
all material separately and construct your generator from the
ground up. |
|
Information
Gathering:
Gather information about your
project. If you are a basic or advanced member of ScienceProject.com,
your project advisor may prepare the initial information that you need
and enter them in this section. In any case it is necessary for you to
read additional books, magazines or ask professionals
who might know in order to learn more about the subject of your research. Keep track of where you got your information from.
Electric Generator
When a conductor such as a copper wire
cross magnetic fields, an electric force is created in the wire. Almost
all electric generators have a rotor and a stator. Rotor is the magnet
that rotates inside stator. Stator is made of one or more coils of wire.
|
Question/ Purpose:
What do you want to
find out? Write a statement that describes what you want to do.
Use your observations and questions to write the statement.
The purpose of this project is to build
a simple electric generator. If you want to build an electric generator
as a display project, you will not need any question.
If you want to do this as an
experimental project, following are some suggested questions:
- How does the speed of turning rotor
affect the production of electricity?
- How does the diameter of wire coil
affect the amount of electricity?
- How does the number of loops of wire
in the coil affect the amount of electricity?
- How does the diameter of coil wire
affect the electric current?
- How do the material used in the
construction of an electric generator affect the production of
electricity?
|
Identify Variables:
When you think you
know what variables may be involved, think about ways to change
one at a time. If you change more than one at a time, you will
not know what variable is causing your observation. Sometimes
variables are linked and work together to cause something. At
first, try to choose variables that you think act independently
of each other.
Dependent and Independent Variables
The factor that you are testing is your
independent variable. For example the speed of turning and diameter of
wire are samples of independent variables. The rate of production of
electricity is the dependent variable.
|
Hypothesis:
Based on your gathered
information, make an educated guess about the answer to your question or
the result of your experiment.
Depending on the question that you
select, you may predict an answer. That is called your hypothesis.
|
Experiment
Design:
Design an experiment
to test each hypothesis. Make a step-by-step list of what you
will do to answer each question. This list is called an experimental
procedure. For an experiment to give answers you can trust, it
must have a "control." A control is an additional experimental
trial or run. It is a separate experiment, done exactly like
the others. The only difference is that no experimental variables
are changed. A control is a neutral "reference point"
for comparison that allows you to see what changing a variable
does by comparing it to not changing anything. Dependable controls
are sometimes very hard to develop. They can be the hardest part
of a project. Without a control you cannot be sure that changing
the variable causes your observations. A series of experiments
that includes a control is called a "controlled experiment."
Electric Generator
Wooden
Generator
Preparation:
If you are buying a kit, all the wooden
parts are included and they are already cut to the size. So you just
need to connect them. If you don't have a kit, prepare the wooden parts
as follows:
- Cut two square pieces from the balsa
wood (3.5" x 3.5").
- Make a 3/8" hole in the center
of each square.
- Cut four 1" x 3 7/16.
- Cut a 3/4" piece from the
1" wood dowel. Make a 3/8" hole in the center of it.
Insert a 6" long 3/8" wood dowel in the hole, apply some
glue. center it and wait for it to dry.
- Make another hole with the diameter
of your rod magnet in the center of the larger wood dowel piece for
the magnet to go through.
| Wood dowels after
completing the step 4 |
 |
| Wood dowels after
completing the step 5 |
 |
Adult supervision
and professional help is required for all cuttings and hole makings.
Procedure:
- Insert the magnet in the hole of the
wood dowel. Center it and use some glue to secure it.
- Use one large square balsa wood and
four smaller rectangular balsa woods to make a box.
- Insert your wood dowel into the hole
in the center of the box. At this time the magnet is inside the box.
- Place the other large square to
complete the box. Apply some glue to the edges and wait for the glue
to dry. By now, you have a box and inside the box you have a magnet
that can spin when you spin the wood dowel.
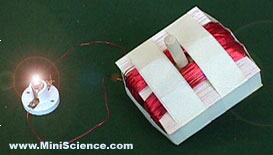
- Wrap 200 turns of copper wire around
the box and use masking tape to secure it.
- Remove the insulation from the ends
of the wire and connect it to the screws of the bulb holder or base.
- Insert the light bulb
- Spin the wood dowel fast to get the
light.
|
|
Materials and
Equipment:
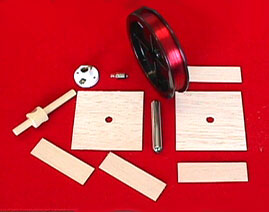
Following are the material that you
need in order to construct a wooden electric generator.
- Wood dowel 3/8" diameter
- Wood Dowel 1" diameter.
- Rod magnet 3" long
- Insulated copper wire 27 AWG,
200 feet
- 1.2 Volt Screw Base light Bulb
- Base for the light bulb
- Small sand paper
- Wood Glue
- 1/2 Square foot Balsa wood
(1/8" diameter)
|
 |
Where to buy?
You may purchase wood from some
hardware stores or home improvement stores or hobby stores.
Magnet can be purchased from hardware
stores.
Insulated copper wire can be purchased
from hardware stores
A kit including all material pictured
above is available at MiniScience.com.
|
Results of
Experiment (Observation):
Experiments are often
done in series. A series of experiments can be done by changing
one variable a different amount each time. A series of experiments
is made up of separate experimental "runs." During
each run you make a measurement of how much the variable affected
the system under study. For each run, a different amount of change
in the variable is used. This produces a different amount of
response in the system. You measure this response, or record
data, in a table for this purpose. This is considered "raw
data" since it has not been processed or interpreted yet.
When raw data gets processed mathematically, for example, it
becomes results. |
Calculations:
If you do any calculation for
your project, write your calculations in this section. |
|
Summery
of Results:
Summarize what happened.
This can be in the form of a table of processed numerical data,
or graphs. It could also be a written statement of what occurred
during experiments.
It is from calculations using
recorded data that tables and graphs are made. Studying tables
and graphs, we can see trends that tell us how different variables
cause our observations. Based on these trends, we can draw conclusions
about the system under study. These conclusions help us confirm
or deny our original hypothesis. Often, mathematical equations
can be made from graphs. These equations allow us to predict
how a change will affect the system without the need to do additional
experiments. Advanced levels of experimental science rely heavily
on graphical and mathematical analysis of data. At this level,
science becomes even more interesting and powerful. |
Conclusion:
Using the trends in
your experimental data and your experimental observations, try
to answer your original questions. Is your hypothesis correct?
Now is the time to pull together what happened, and assess the
experiments you did. |
Related Questions
& Answers:
What you have learned
may allow you to answer other questions. Many questions are related.
Several new questions may have occurred to you while doing experiments.
You may now be able to understand or verify things that you discovered
when gathering information for the project. Questions lead to
more questions, which lead to additional hypothesis that need
to be tested. |
|
Possible
Errors:
If you did not observe
anything different than what happened with your control, the
variable you changed may not affect the system you are investigating.
If you did not observe a consistent, reproducible trend in your
series of experimental runs there may be experimental errors
affecting your results. The first thing to check is how you are
making your measurements. Is the measurement method questionable
or unreliable? Maybe you are reading a scale incorrectly, or
maybe the measuring instrument is working erratically.
If you determine that experimental
errors are influencing your results, carefully rethink the design
of your experiments. Review each step of the procedure to find
sources of potential errors. If possible, have a scientist review
the procedure with you. Sometimes the designer of an experiment
can miss the obvious. |
|
References:
http://www.miniscience.com/projects/KITWG/index.html
|
|
|
